Master Your Instant Pot: The Ultimate Guide to Essential Tips & Hacks for Effortless Cooking
The Instant Pot has revolutionized kitchens worldwide, transforming complex recipes into simple, time-saving meals. Whether you’re a newcomer just unboxing your versatile appliance or a seasoned pressure-cooking enthusiast looking to elevate your culinary game, mastering its full potential can seem daunting. Fear not! We’ve compiled the ultimate collection of expert Instant Pot tips and hacks designed to make your cooking experience smoother, cleaner, and even more delicious. From essential maintenance tricks to advanced cooking techniques, these insights will guide you far beyond the basic instruction manual, ensuring every meal is a triumph.
This page contains affiliate links. For more information, please see our disclosures here.
Unlock Your Instant Pot’s Full Potential: Essential Tips for Every User
Tip #1: Master Your Instant Pot Sealing Rings – One is Never Enough!

One of the most valuable Instant Pot tips, and arguably the first you should implement, revolves around the humble sealing ring. This crucial silicone component, nestled inside the lid, is responsible for creating the airtight seal necessary for pressure cooking. Without it, your Instant Pot wouldn’t be able to pressurize, making it virtually impossible to achieve those quick, tender results it’s famous for.
However, silicone, by its very nature, is highly porous and prone to absorbing odors. Imagine cooking a robust chili one day, and a delicate cheesecake the next. The lingering aroma of chili, even after thorough washing, can subtly transfer to your sweet dessert, creating an unpleasant flavor clash. This isn’t just a minor inconvenience; it can truly diminish the quality of your culinary creations, especially for dishes with subtle flavors like rice or desserts. Rice, being a blank canvas, is particularly susceptible and can easily pick up unwanted smells and tastes from a contaminated ring.
To combat this common issue, the ultimate hack is simple: invest in at least two, preferably three, extra sealing rings. Dedicate one ring exclusively for savory dishes like stews, curries, and meats. Another can be reserved solely for neutral or sweet preparations such as rice, yogurt, and desserts. Many Instant Pot users find it helpful to assign colors for easy identification – for instance, a red ring for savory, a blue for sweet, and the clear original for versatile everyday use. This simple organization prevents flavor cross-contamination and ensures that your delicate rice never tastes like last night’s beef stew, and your cheesecake remains perfectly pristine.
While cleaning your sealing rings with soapy water and running them through the dishwasher helps reduce odors, it rarely eliminates 100% of absorbed smells. Having dedicated rings is the most effective preventative measure, ensuring your meals always taste as intended. Proper storage is also key: allow rings to air dry completely before storing to prevent mold or mildew, and keep them in an airtight container if you’re particularly concerned about external odors. This proactive approach to sealing ring management will significantly enhance your Instant Pot cooking experience.
Tip #2: Simplify Rice Cleanup: The Power of a Quick Soak

For many, the Instant Pot is a rice-cooking revelation, consistently delivering perfectly fluffy grains with minimal effort. But if you’ve ever found yourself battling stubbornly stuck-on rice at the bottom of the inner pot, you know the post-meal cleanup can quickly become a chore. This essential Instant Pot cleaning tip, often overlooked, can save you significant scrubbing time and effort, especially if you cook rice frequently, as many Instant Pot enthusiasts do.
The secret lies in addressing the rice promptly after cooking. Starch, the primary component of rice, hardens as it cools and dries, bonding firmly to the stainless steel surface of the inner pot. The longer the rice sits and dries, especially if you’re not utilizing the “keep warm” function, the more challenging it becomes to remove. Ideally, you should transfer your cooked rice to a serving dish immediately after the pressure release, allowing the inner pot to cool slightly before tackling cleanup. Removing it while it’s still warm prevents the starch from hardening and adhering to the pot.
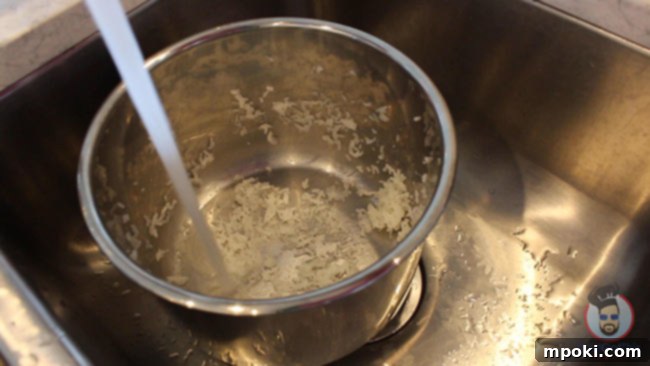
However, life happens, and sometimes rice gets left behind. When you inevitably encounter dried, stuck-on rice, the solution is remarkably simple: soak it! Remove the stainless steel inner pot from your Instant Pot and place it in your kitchen sink. Add a few cups of warm water – enough to comfortably cover any dried rice residue – and let it sit for a good 30 minutes. At this stage, there’s no immediate need for soap; the warm water alone will work wonders. The water rehydrates the dried starch, softening it and loosening its grip on the pot’s surface. After a thorough soak, you’ll find that a light scrape with a non-abrasive spatula or sponge is usually all it takes to free the rice. A quick wash with soapy water and you’re done! This simple soaking hack transforms a potentially frustrating cleanup into a quick and effortless task, ensuring your Instant Pot is always ready for its next culinary adventure.
Tip #3: Conquering Caked-On Gunk: The “Sauté and Scrape” Method

Some dishes, particularly those involving rich sauces, gravies, or caramelized ingredients, can leave behind a stubborn, caked-on mess that even a long soak can’t fully conquer. When faced with these formidable residues at the bottom of your Instant Pot’s inner pot, it’s time to get a little “aggressive” – in the smartest, most effective way possible. This powerful cleaning hack utilizes the Instant Pot’s own sauté function to make even the toughest grime disappear, mirroring a classic stove-top deglazing technique for cleaning pans.
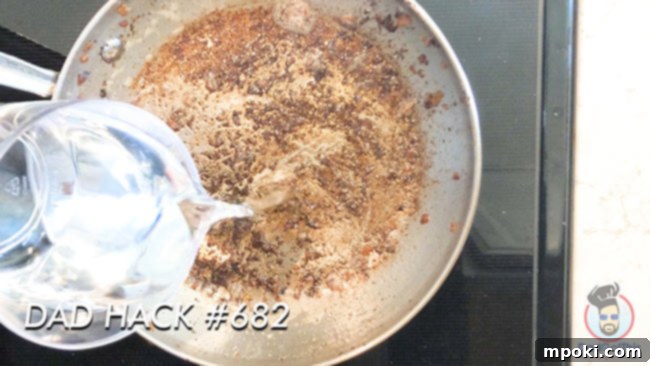
Here’s how to tackle deeply stuck-on food: first, ensure your inner pot is back in the Instant Pot housing. Pour in approximately 2-3 cups of water, or enough to comfortably cover the affected areas where food is stuck. Next, select the “Sauté” function and set it to “More” for a higher heat setting. Bring the water to a rolling boil. As the water heats up and boils vigorously, it begins to loosen and hydrate the dried-on food particles. The intense heat combined with the water’s agitation works synergistically to break down stubborn residues, softening and lifting them from the stainless steel surface.
While the water is boiling, take a sturdy metal spatula or a wooden spoon and gently but firmly scrape the bottom and sides of the pot. You’ll notice the caked-on gunk beginning to lift away with surprising ease. Continue to boil and scrape for about 5-10 minutes, or until most of the tough stuff has visibly dissolved and separated from the pot’s surface. Once the water has cooled sufficiently, carefully pour it out. You’ll find that the once formidable mess has been transformed into a much softer, easily removable residue, ready for a final wash with soap and water. This “sauté and scrape” method is a game-changer for maintaining a pristine Instant Pot, ensuring it remains spotless and ready for your next culinary adventure, even after the messiest meals like chili, stews, or dishes with burnt-on sauces.
Tip #4: The Unsung Hero: The Silicone Pan Scraper

Even with the best soaking and sautéing techniques, occasionally, a few tenacious bits of food might cling to your Instant Pot’s inner pot, refusing to budge. For these moments, or simply for everyday effortless cleaning, there’s one indispensable, often overlooked tool that every Instant Pot owner should have: the silicone pan scraper. This humble kitchen gadget might seem small, but its utility extends far beyond its modest appearance, making it one of the best investments for a clean and well-maintained kitchen.
The beauty of a silicone pan scraper lies in its material. Unlike harsh abrasive sponges, steel wool, or metal scouring pads – which are strictly advised against for the Instant Pot’s stainless steel inner pot due to their potential to scratch and damage the surface – silicone is non-abrasive yet remarkably effective. Its firm, angled edge allows you to apply pressure and scrape away burnt, sticky, or dried-on food without leaving a single mark. This means you can confidently tackle any mess, from caramelized sugars to stubbornly stuck rice, knowing your pot’s pristine finish is protected.
These scrapers are incredibly affordable, often available in multi-packs for just a few dollars, making them an accessible upgrade for any kitchen. They are durable, heat-resistant, and dishwasher-safe, making them a practical and long-lasting addition to your cleaning arsenal. While invaluable for your Instant Pot, their usefulness isn’t limited there; they excel at cleaning stainless steel cookware, cast iron pans, glass baking dishes, and even non-stick surfaces without fear of damage. Many home cooks, especially those who prefer cooking with stainless steel and cast iron, find them indispensable for daily cleanup.
Combining a silicone pan scraper with the soaking methods described in Tip #2 or the “sauté and scrape” technique from Tip #3 creates an unbeatable cleaning duo, transforming dreaded cleanup into a quick, satisfying task. Forget struggling with stubborn food particles; grab a silicone pan scraper and discover the joy of effortless, scratch-free cleaning, keeping your Instant Pot looking and performing like new for years to come.
Tip #5: Elevate Flavor and Texture: Sear or Broil AFTER Pressure Cooking
Many Instant Pot recipes instruct users to sauté or brown meats before pressure cooking, aiming for that “one-pot” convenience. While this approach certainly saves dishes, it often sacrifices a crucial element of culinary excellence: texture and depth of flavor. If you truly want to elevate your Instant Pot dishes beyond merely “steamed,” embrace this game-changing tip: sear, broil, or fry your food after pressure cooking.
The Instant Pot excels at tenderizing tough cuts of meat and infusing flavors deeply into dishes thanks to its high-pressure, moist-heat environment. This method yields incredibly succulent results. However, this same moist environment prevents the Maillard reaction – the chemical process responsible for that irresistible golden-brown crust, complex flavors, and enticing aromas associated with searing, roasting, and grilling. Food emerging directly from the pressure cooker, while incredibly tender, often has a pale, somewhat uniform appearance and a texture akin to steamed food, which can leave many diners feeling a dish is “missing something.”
Consider dishes like chicken thighs, pork chops, or even whole chickens. While they can be fully cooked and tenderized in the Instant Pot, they lack the appealing crispy skin or caramelized surface that adds so much to the eating experience. The solution is simple: once your protein is perfectly tenderized in the Instant Pot, carefully remove it from the cooking liquid. Then, transfer it to a separate pan for a quick sear on the stovetop, place it under the broiler in your oven for a few minutes, or even use an air fryer or an Instant Pot air fryer lid attachment. This post-pressure cooking browning technique allows you to achieve that desirable crispy texture and rich, savory flavor that pressure cooking alone cannot provide, without overcooking the interior of the meat.
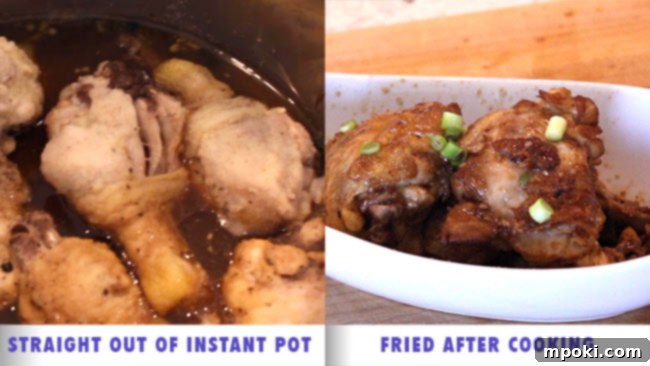
A prime example is our Filipino chicken adobo recipe. Cooked entirely in the Instant Pot, the chicken is wonderfully tender and flavorful. But take those pieces out and quickly fry them in a little oil, and you unlock a whole new dimension: deeply browned, slightly crispy skin complementing the melt-in-the-mouth interior. This method offers the best of both worlds: the speed and tenderizing power of pressure cooking combined with the superior flavor and texture of a perfectly seared finish. The only caveat to this tip is for dishes where browning the meat beforehand is absolutely essential to build the base flavor of a gravy or stew, where the browned bits (fond) are incorporated into the sauce. In such cases, a brief pre-sauté is still beneficial, but for most standalone protein dishes, post-cooking searing is the secret to culinary perfection and truly unforgettable meals.
Which presentation looks more appetizing to you? The difference is clear!

Elevate Your Instant Pot Experience Today!
These five essential Instant Pot tips and hacks are designed to transform your pressure cooking journey, making it more efficient, cleaner, and ultimately, more rewarding. From preventing flavor transfer with dedicated sealing rings to ensuring effortless cleanup with strategic soaking and the right tools, and finally, to mastering the art of post-cooking searing for unparalleled flavor and texture – each tip builds on the foundation of smart cooking and maintenance, helping you get the most out of this incredible appliance.
We encourage you to experiment with these techniques and discover how they can dramatically improve your daily cooking. Don’t let common Instant Pot challenges deter you; instead, use these insights to become a more confident and skilled pressure cooker user. Do you have a favorite Instant Pot hack that has changed your cooking game? Share your wisdom in the comments below – we’d love to hear from you!
Be sure to explore our other Instant Pot content for more invaluable insights, including our comprehensive guide to Instant Pot basics, detailed tips for cooking perfect rice every time, and our beloved Filipino Chicken Adobo recipe that perfectly showcases the power of post-cooking browning. Happy cooking, and enjoy your culinary adventures with your Instant Pot!
Stay Connected: Find More Instant Pot Wisdom and Recipes on Our YouTube Channel!
