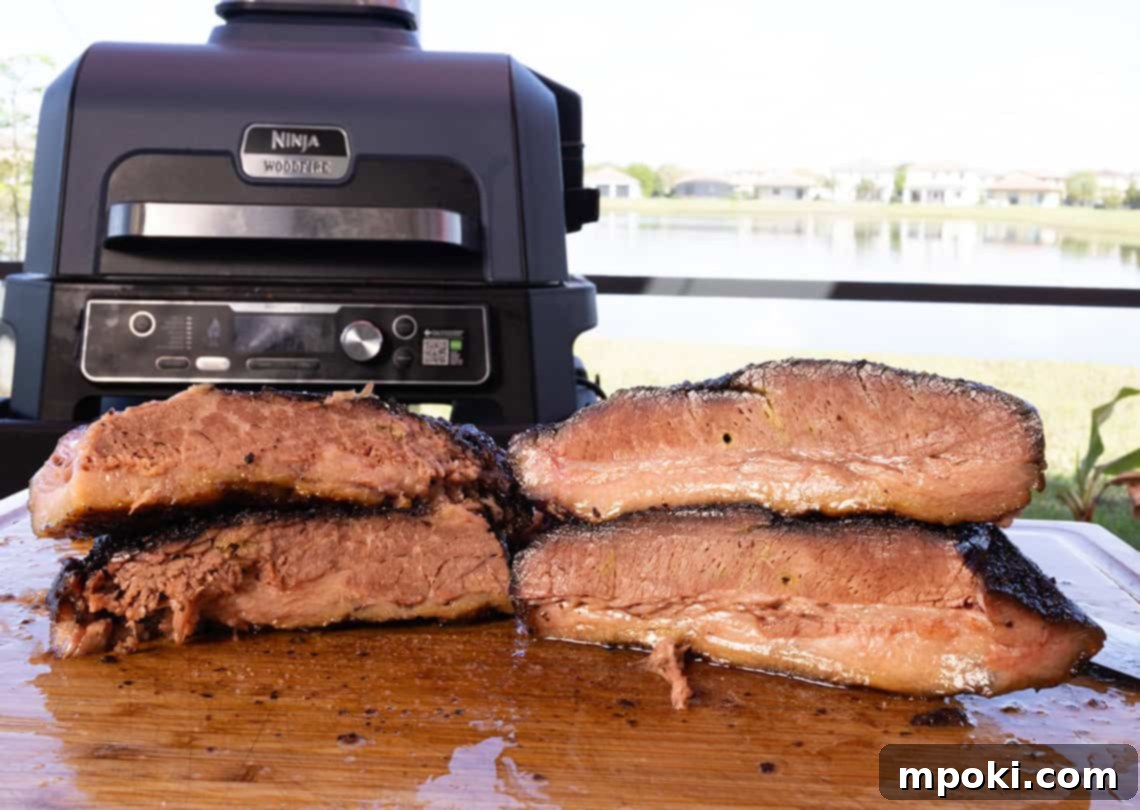
Embark on an epic culinary journey into the world of barbecue with this comprehensive guide to mastering the Ninja Woodfire Brisket. For enthusiasts who appreciate the art of slow-smoked meats but crave modern convenience, the Ninja Woodfire Grill offers a revolutionary approach to achieving a perfectly tender and incredibly flavorful brisket. This isn’t just a recipe; it’s a step-by-step masterclass designed to transform your backyard barbecue game and leave your guests utterly impressed.
Our quest for the ultimate brisket begins with selecting the right cut. We’ll be working with a well-trimmed 8-14 lb prime brisket, the foundation of any truly spectacular smoked meat. The Ninja Woodfire Grill, with its innovative smoking technology, allows us to meticulously control temperature and infuse deep, authentic smoky flavor without the constant vigilance traditionally required. Prepare to unlock the secrets to a melt-in-your-mouth texture, a beautiful bark, and a juicy interior that will make every bite a barbecue lover’s dream.

Beyond the initial preparation, our journey will delve into the nuances of seasoning, the critical role of consistent temperature control, and the magic of a strategic spritz to maintain moisture. We’ll explore the unique “heated rest” phase, a technique that sets this recipe apart, ensuring unparalleled tenderness and juiciness. Whether you’re a seasoned pitmaster refining your craft or a backyard barbecue enthusiast eager to conquer one of grilling’s most rewarding challenges, this guide provides the knowledge and confidence you need to create a brisket that’s truly special. Get ready to fire up your Ninja Woodfire Grill and become a brisket legend!
This Page Contains Affiliate Links. For more Info See My Disclosures here.
Table of Contents
- The Journey to Brisket Perfection: Why the Ninja Woodfire Grill?
- Choosing and Trimming Your Brisket: The Foundation of Flavor
- The Art of Seasoning and Smoke: Building the Flavor Profile
- Temperature Control and Spritzing: Maintaining Moisture and Flavor
- Navigating “The Stall” and the Butcher Paper Wrap
- The Secret Weapon: The Extended Heated Rest
- Serving Your Masterpiece: Tips for Presentation and Pairing
- Ninja Woodfire Brisket Top Tip
- Full Recipe: Ninja Woodfire Brisket
- Ingredient and Equipment Links
- Discover More on Dad Got This YouTube Channel
The Journey to Brisket Perfection: Why the Ninja Woodfire Grill?
Brisket, the king of barbecue, is renowned for its rich flavor and incredibly tender texture when prepared correctly. Traditionally, smoking a brisket demands hours of dedicated attention, often requiring complex setups and constant monitoring. This is where the Ninja Woodfire Grill steps in, revolutionizing the home smoking experience. This innovative grill combines the authentic taste of woodfire smoking with the convenience of electric grilling, making it accessible to everyone, from seasoned pitmasters to aspiring backyard chefs.
The Ninja Woodfire Grill’s ability to maintain consistent low temperatures, coupled with its integrated smoker box, creates an ideal environment for slow-cooking large cuts like brisket. It minimizes temperature fluctuations, a common pitfall in traditional smokers, which are crucial for rendering fat and breaking down connective tissues into succulent goodness. With the Ninja Woodfire Grill, you get that coveted smoky flavor and perfect texture without the stress of managing a charcoal fire or propane levels for hours on end. It’s a game-changer for anyone looking to achieve professional-grade results with less effort.
Choosing and Trimming Your Brisket: The Foundation of Flavor
The journey to an exceptional Ninja Woodfire Brisket begins long before it ever touches the grill: it starts with selecting and preparing your cut. We recommend an 8-14 lb prime brisket. “Prime” refers to the highest USDA grade for beef, indicating superior marbling – the intramuscular fat that renders during cooking, infusing the meat with flavor and keeping it moist. While a “Choice” grade can also produce good results, Prime offers that extra edge in tenderness and richness.
Trimming is a critical, often underestimated, step. A properly trimmed brisket ensures even cooking, allows the smoke and rub to penetrate effectively, and prevents undesirable textures. The main goal is to remove excess hard fat and silver skin from the meat side (the “flat”) and shape the brisket for optimal air and smoke circulation. You want to leave a consistent fat cap of about 1/4 to 1/2 inch on the point side. This fat cap acts as a protective layer, basting the meat as it slowly melts, while excessive fat can prevent the formation of a flavorful bark and result in a greasy final product. Don’t discard that trimmed fat entirely; it can be rendered into beef tallow, which we’ll use later in the recipe to enhance richness.
The Art of Seasoning and Smoke: Building the Flavor Profile
Once your brisket is expertly trimmed, it’s time to apply the rub. This step is where you begin to build the complex flavor profile of your smoked masterpiece. While many pitmasters meticulously craft their own rubs, a high-quality store-bought brisket seasoning works wonderfully. The key is to apply it evenly and generously across all surfaces of the brisket, ensuring every inch is coated to form that irresistible bark during the smoking process. Don’t be shy; the rub helps create that signature crust and locks in moisture.
After seasoning, the brisket benefits from a period in the refrigerator. This isn’t just for convenience; it’s a strategic move. “Cold meat accepts smoke better” is a classic pitmaster saying, and for good reason. A cold brisket surface will absorb more smoke particles, leading to a deeper, more pronounced smoke ring and flavor. Plan to season your brisket several hours, or even overnight, before you intend to start smoking, allowing the rub to adhere and the meat to chill thoroughly.
For pellets, we’re opting for pecan shell pellets. Pecan wood provides a balanced, nutty, and slightly sweet smoke flavor that complements beef beautifully without overpowering it. It’s a versatile choice that’s milder than hickory but more robust than fruitwoods, striking the perfect balance for a rich cut like brisket. Ensure your Ninja Woodfire Grill’s pellet hopper is full at the start and regularly topped up throughout the cook to maintain continuous smoke production.
Temperature Control and Spritzing: Maintaining Moisture and Flavor
Consistent temperature control is arguably the most crucial factor in achieving a tender and juicy brisket. The Ninja Woodfire Grill excels here, allowing you to set a precise temperature and largely forget about it for hours. For our initial smoke phase, we’ll set the grill to 200°F (93°C) for a long, slow cook. This low temperature gently renders the fat and breaks down tough connective tissues, resulting in that coveted “melt-in-your-mouth” texture. Using a reliable meat thermometer, ideally one with probes for both the flat and the point, is essential for monitoring internal temperatures accurately.
During this initial smoking phase, which can last several hours, a regular spritz with a 50/50 mix of apple cider vinegar and water is key. This simple liquid serves multiple purposes:
- Moisture: It prevents the exterior of the brisket from drying out and becoming too crispy or tough.
- Bark Formation: The moisture helps the rub adhere and creates a tacky surface conducive to developing a rich, flavorful bark.
- Flavor: The apple cider vinegar adds a subtle tang that beautifully complements the smoky beef, helping to cut through the richness.
Spritz every 1-2 hours, paying particular attention to any areas that appear to be drying out. The goal isn’t to soak the brisket but to lightly mist it, maintaining a moist surface throughout the smoke.
Navigating “The Stall” and the Butcher Paper Wrap
Every brisket smoker eventually encounters “the stall,” a frustrating plateau where the brisket’s internal temperature mysteriously stops rising, often hovering between 150°F and 170°F (65°C and 77°C) for several hours. This phenomenon is due to evaporative cooling: as moisture evaporates from the surface of the meat, it cools the brisket, much like sweat cools your body. This is a normal part of the process, and patience is your most valuable tool.
When your brisket’s internal temperature reaches approximately 167°F (75°C) in both the flat and the point, it’s time to wrap. Wrapping helps power through the stall by trapping moisture and heat, accelerating the cooking process, and further tenderizing the meat. Butcher paper is the preferred wrapping material over aluminum foil. While foil creates a tighter seal, steaming the brisket, butcher paper is breathable. This breathability allows some moisture to escape, preventing the bark from becoming soggy while still promoting tenderization and accelerating the cook.
Before wrapping, enhance the brisket’s richness by adding about ½ cup of beef tallow. Melted beef tallow, either store-bought or rendered from your brisket trimmings, will coat the meat, ensuring incredible juiciness and a deep, savory flavor. Once wrapped, carefully reinsert your temperature probes (if using) and return the brisket to the Ninja Woodfire Grill, increasing the temperature to 250°F (121°C) to continue cooking until it reaches desired tenderness.
The Secret Weapon: The Extended Heated Rest
After the initial smoking and wrapped cooking, when the brisket reaches an internal temperature of around 193°F (89°C), it’s time to start checking for tenderness. This is where experience (or careful instruction) comes in, as temperature alone isn’t the sole indicator of doneness. You’re looking for a specific “probe tender” feel – when an instant-read thermometer slides into the meat with very little resistance, much like pushing it into a jar of creamy peanut butter. If it feels tight, continue cooking and check every 30 minutes. A brisket can be perfectly tender anywhere from 195°F to over 205°F (90°C to 96°C).
Once probe tender, let the brisket rest on the counter for one hour. This allows the intense cooking process to slow down, and the internal temperatures to equalize. But here’s the game-changing technique: the extended heated rest. After the initial hour, return the wrapped brisket to your Ninja Woodfire Grill (or Woodfire Oven if you have one), set to a low temperature of 145°F (63°C), and let it rest for an additional 12 hours or even longer.
This extended heated rest is a true secret weapon for brisket perfection. It continues to break down connective tissues at a gentle temperature, allowing the muscle fibers to relax and reabsorb juices. The result is unparalleled tenderness, enhanced juiciness, and a more uniform texture throughout the entire brisket. It’s a low and slow finish that significantly ramps up the quality, ensuring every slice is incredibly moist and succulent. This method also provides incredible flexibility, allowing you to cook your brisket overnight and serve it perfectly at your leisure the next day.
Serving Your Masterpiece: Tips for Presentation and Pairing
After patiently waiting through the smoking, wrapping, and extended heated rest phases, the moment of truth arrives: slicing and serving your Ninja Woodfire Brisket. Remember, how you slice your brisket can significantly impact its tenderness. Always slice against the grain. The flat and the point have grains that run in different directions, so separating them and slicing each section appropriately is crucial. The flat is typically sliced into thinner pieces, while the point, with its higher fat content, can be cut into thicker slices or even cubed for burnt ends.
Before slicing, collect any flavorful juices that have accumulated in the butcher paper and pour them over the sliced brisket. This liquid gold adds another layer of moisture and taste. Present your brisket on a large cutting board, showcasing its beautiful bark and smoke ring.
No brisket meal is complete without a selection of classic barbecue sides. Consider pairing your Ninja Woodfire Brisket with:
- Creamy Mac and Cheese
- Tangy Coleslaw
- Homestyle Baked Beans
- Soft Cornbread
- Pickles and Onions (for a refreshing bite)
The rich, smoky flavor of the brisket also pairs wonderfully with a robust craft beer, a dry red wine, or a classic sweet tea. This Ninja Woodfire Brisket is more than just a meal; it’s a centerpiece dish, a celebration of slow smoking combined with modern grilling technology, guaranteed to impress at any gathering.
Ninja Woodfire Brisket Top Tip
Cold meat accepts smoke better. Always ensure your brisket is thoroughly chilled before placing it on the smoker. This allows the surface to absorb more smoke particles, leading to a richer smoke ring and deeper smoky flavor in the final product.
Full Recipe: Ninja Woodfire Brisket

Ninja Woodfire Brisket
Print
Pin
Rate
Main Course
American
bbq, ninja woodfire
30
10
12
22
30
16 people
409kcal
Dad
45
Equipment
- Ninja Woodfire Grill
- Cutting Board
- Knife
- Wood Pellets
- Butcher Paper
- Spray Bottle
Ingredients
- 8-14 lb Prime Brisket
- 1 Cup Brisket Seasoning You don’t need to use all of it. Follow the video.
- ½ Cup Beef Tallow
- 2 Cups Apple Cider Vinegar You don’t use all of it.
- 2 Cups Water You don’t use all of it.
Instructions
- Trim your brisket however you like. The main thing you need to do is remove the fat and silver skin on the meat side and any really hard fat. If you want to know how to trim a brisket, watch the video in the recipe.
- Season your brisket with whatever seasoning you like. For this cook, Dad used Buccee’s Brisket Rub. Once seasoned, place your brisket in a refrigerator to stay cold because cold meat absorbs smoke better.
- Load your Ninja Woodfire Grill with your preferred pellets. For this cook, Dad used Pecan Shell Pellets from Smokinpecan.
- Set your Ninja Woodfire to the smoker setting at 200°F (93°C) and 12 hours.
- Once the Ninja Woodfire is up to temp and says “add food,” place your brisket in the center of the grill. If you are using a pro connect version, insert one probe in the flat and one in the point.
- Make sure you check your pellet hopper every hour and refill as needed. When you refill the hopper, make sure you fill it all the way up, as the igniter is at the top of the hopper, and if it is not full, the pellets might not ignite.
- Every 1-2 hours, spray the brisket with a 50/50 apple cider vinegar and water mixture. Just try to make sure you are keeping the brisket moist and looking for bits that are getting “crispy.”
- When the internal temp of the brisket reaches 167°F (75°C) (on my cook this took a little over 6 hours) in the flat and point, go ahead and pull it out of the smoker. Wrap the brisket in butcher paper. Add about ½ cup of beef tallow (fat) to the brisket before you wrap it. If you are using probes, take the probes out and then reinsert them after you wrap it to make it easier.
- Change the temp on the Ninja Woodfire Grill to 250°F (121°C) and continue cooking.
- When the temp of the brisket reaches 193°F (89°C), it is time to start checking it for tenderness. On my cook, this took a little over 3 hours. Poke the brisket through the paper with an instant-read thermometer. You are looking for it to not have much resistance. It should feel like you are sticking your probe into a jar of creamy peanut butter. If you are new to this, it may be helpful to remove the brisket and unwrap it, as the paper may trick you into thinking there is more resistance than there actually is. If the brisket feels tender all over, it is time to take it off the smoker. If it is not, return it and check it every 30 minutes. A brisket can go all the way up over 205°F (96°C) before it feels tender. This is not about the temp; it is about the feel. On my cook, the total brisket cook took about 10 hours.
- Let your brisket rest out on the counter for 1 hour to stop the cooking process.
- Set your Ninja Woodfire to smoker and 145°F (63°C) and set it for 12 hours. In my video, I used the Ninja Woodfire Oven for this, but you can use the Ninja Woodfire also.
- After the one-hour rest, place your brisket inside the Woodfire and go to SLEEP!
- The next day, make sure you get back to your Woodfire before the 12 hours are up and the cooker shuts off. If you are not ready to eat the brisket before the 12 hours are up, just add more time. A longer rest will only make your brisket BETTER. When you are ready to eat, take the brisket out, and make sure to put any juices from the wrapper over it before you slice & enjoy!
Video
Nutrition
Serving:
226g
|
Calories:
409kcal
|
Carbohydrates:
0.3g
|
Protein:
47g
|
Fat:
22g
|
Saturated Fat:
10g
|
Polyunsaturated Fat:
1g
|
Monounsaturated Fat:
9g
|
Trans Fat:
0.2g
|
Cholesterol:
156mg
|
Sodium:
228mg
|
Potassium:
772mg
|
Sugar:
0.1g
|
Vitamin A:
177IU
|
Calcium:
16mg
|
Iron:
4mg

Tried this recipe?
Mention @DadGotThis or tag #DadGotThis!
Ninja Woodfire Brisket Ingredient and Equipment Links:
Like Dad’s Shirt?
Check out: RSVLTS.com
Use Dad’s Affiliate Link & get your own Ninja Woodfire Pro Connect Outdoor Grill:
Get it on Ninja Kitchen!
Smokin Pecan Pellets:
Get them on Amazon
Buc-ee’s Brisket Rub:
Get it on Amazon
Did you know Dad is on YouTube?
Go check out Dad’s YouTube channel for all kinds of great cooking videos and food-related content. Discover more barbecue tips, grilling techniques, and delicious recipes to elevate your culinary skills.
